Friday, 27 October 2017

Experimenting with more Dirty Pours

Hello there, hope you are well and enjoying your crafting.
I found out about Dirty Pours, yes that really is the name for one type of Acrylic Paint Pouring, quite by accident on You Tube and now I'm hooked. 
Before I go any further I just want to explain what a Dirty Pour is! 
When you have mixed up the colours you want to do a pour with, you get yourself a empty container and start to add those different colours in layers in the container. Simple as that. By adding the colours together you get whats called a dirty pour as the colours blend in part to each other making new colours.
What I then enjoy doing, is to 'Flip' that cup over onto the canvas, giving the paint a couple of minutes to slide down the cup then lift it up to see the paint flowing out. You never quite know what will happen!
 This photo shows that once the single colours have been well mixed with the PVA Glue, water a little Floetrol and a few drops of Silicone oil they are then layered up into what now becomes a 'Dirty Cup' of Acrylic paints.

 The Dirty Cup is then flipped on top of the canvas and left to settle.
Then the cup is lifted up. I never get bored of seeing this step. New colour emerge, you never quite know whats going to happen!

Over the last few weeks I have been experimenting with a few different techniques and materials so thought I would share a couple of these with you.
Now most people know I love the IndigoBlu products so of course have quite a few of their products so used these in my 'experiments'.

The first one I have to share with you is using the IndigoBlu Super Thick Slap it on, watered down and used instead of the PVA glue. Now this medium has been produced to use through stencils and  multi media work so although watered down it kept a thicker texture so pouring this with the acrylic paints produced a thicker pour that held its shape and needed a little bit more persuading to flow across the canvas.


 The Super Thick Slap it on has been mixed with water, just enough to drip off the lollystick
 A dollop of paint has been put into mixing cups. Love these colours together, very autumnal!
 I first of all mixed the paints with a dash of Floetrol which helps the mixture to flow better.
 I then added the Super Thick & water mixture
 Once thoughtly mixed I added 3 drops of Silicone to each colour of paint
 I then poured layers of single colours on top of each other into a spare cup
 This was the outcome when the cup had been flipped and pulled up. I wasnt so keen on all the brown so I tipped the canvas this way and that until I was happy with the other colours that came to the top. You may well have also noticed there were a lot of bubbles in this mixture. I managed to get rid of a lot of them using the torch but think because I used a thick medium it held on to some of them.
I then tillted and moved the canvas until it was completly covered with the paint mixture. You can see the cells forming.

This canvas took about 3 days to dry out before I was able to varnish it. As you can see over that time the colours did change slightly


So the next experiament I carried out was to use the IndigoBlu Luscious Powders to see what would happen. 
So to start this experiment I added some Luscious powders to a small drop of Floetrol and mixed the powder in well 
 I then topped up each shot glass with PVA glue and mixed this in together. One of the things I have learnt is that you really need to mix things in well
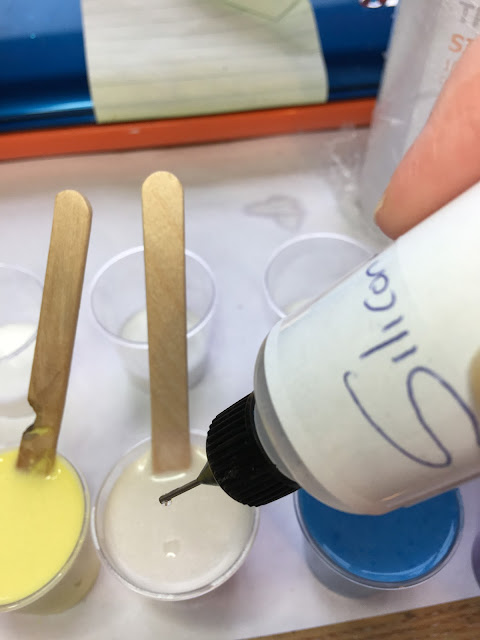
Once mixed I added 4 drops of Silicone oil to each of the colours but not the white

 I then has a spare shot glass at the ready to pour in layers of the Luscious mixture

 Here are the layers of those Luscious colours
When I had flipped the cut over it reminded me of those sand bottle you often see in souvenir shops abroad. 
 This mixture poured really well, just look at those colours and the shine was brilliant.

 After an hour the colours were blening more together than the paint normally does but the cells were still visable.
So after a week of drying out this is what the Luscious Powder pour looked like. You don't get the same depth of colour you get from paint but a lovely shiny, yet muted finish.

For each of the pours I had Paint or Luscious mixture left so tried pouring it on different surfaces. I have to say pouring on anthing other than a flat surface will take some practice, I  have a lot to learn lol!
I first tried pouring onto Dura-lar and it worked really well. It took almost a week to dry out though so its not a quick process but im hoping I can die cut this place for some card making.


 Next I tried  using the Metallic paints mixed with PVA Glue, a little drop of Floetrol and Silicone.


Next I used what was left of the mixtures to cover some small clay faces I had made using molds.

Paint and Luscious covered faces
Paint Pouring over Paper Mache. I first of all covered the face in white Gess-Soo-Good. Because the face is a curved surface you need to be patience when pouring as the paint flows off the curves. Next time I do this I will make the paint mixture a little thicker.


 I also used some small wood pieces I had. I painted them with Gee-Soo-Good first of all so that the mixture wouldnt soak into the wood. 
Look at the sparkle in that Metallic paint!
They look so cool when they are first poured but went quite dark when dry. 

Acrylic Paints

That's all for today but i'm still experimenting. Hope to have more to share with you soon.
If you haven't aleady seen my other post on Dirty Pours here is the link


To learn so much more about this adictive craft check out the videos on Youtube. Some very talented people out there!
Happy Dirty Pouring xx


Tuesday, 26 September 2017

Gift Wrapping - by using your recycled food cans

This weekend I had a bit of fun joining in the 'Weekend Womble' on the Facebook group Junk journals junkies and Mindful Art. You have to re-cycle something you have in the house or something you find when out and about.
As you can see from the photo below I re-used a food can.
*Please be warned that this craft does have sharp parts and should NOT be given to a child.


So go ahead and open one of those pull tag cans at the bottom. Its best to use a can opener that doesn't leave sharp edges.

Take out the food (I ate mine for lunch) and wash out the can and lid in hot soapy water, taking care not to cut yourself. Also dry thoroughly.

Cut out a circle that will fit into the can so that you can write your message on it. You will also need the gift you want to put inside the can and some tissue paper or shred's of wrapping paper.

Place the message upside down into the can so that when the can is opened its the first thing to be seen then add a layer of tissue.

Add the gift then more tissue paper. Add another message or just a plain circle of card.

Add a thick layer of strong wet glue around the edge of the can lid keeping it close to the edge.

Put the lid back onto the can lining it up well so it sits level. Put something heavy on top to weigh it down until the glue dries. Best to leave overnight.

Just to make doubly sure the lid was well attached,  I went around the joint with some Glossy Accents.

I then went on to decorate the can. I decided to use some patterned paper so cut a strip that fitted around the size of the can, two thin strips, which I turned over to use the white side to decorate around the top and bottom edges and two different size circles to fit the lid. 
Make sure that the larger circle sits in the middle of the lid under the pull tab. The smaller circle needs to have a notch cut out of it so it sit neatly under the pull tab.

I painted the lid with white Gess-Soo-Good before adding the paper to cover up the metal.

Once the white layer was dry I painted it over with Lime Marmalade Acrylic paint


Finish off decorating the can and tie a piece of ribbon through the pull tab along with a gift tag.
The recipient opens the can by pulling up the ribbon and pulling back the pull tag.
I hope you enjoy making some of these for yourself xx


Friday, 7 July 2017

Christmas is coming..........................................

Hello there and welcome to my latest blog post.
This one is all about christmas card making.
Yes I know its hard to think about Christmas with the summer just here in the UK, but if you are a card maker, you will know that July is that time of year we make a start on our christmas crafts.

As a huge fan of IndigoBlu I have been lucky enought to receive some of their NEW Stamps and Stencils hot off the press to create samples for Kay Halliwell-sutton's One Day Christmas Special on Hochanda this weekend. (Sat 8th July at 6pm and Sun 9th July).

To start with let me share with you the cards I have made for Kay's show's then I will add links to the New Stamp sets at the end of the post. 
I think the Christmas Stag is going to be my all time favorite Christmas stamp, its such fun image.

Christmas Stag - For this card I stamped the image onto Acetate, coloured in the image on the back of it then added Glossy Accents to the front onto the baubles. To decorate the card front I used the New Snowflake Stencil with inks.


Deer Forest - This card background was created using the Paint Pouring Technique with the IndigoBlu paints. (I have done a previous blog post about Paint Pouring). The stamp was inked in black then I fussy cut around the image. The text was done with embossing paste through a stencil then Unicorn Sparkles were sprinkeled on top. 


For this card I used the New Snowflake Stencil with Ultra Thick Slap-it-On coloured with Teal Luscious Powder on Acetate, sprinkled with Unicorn Sparkles. The image was stamped in blue ink then die cut out. Ribbon and pale blue half pearls were used for simple decoration. 


Christmas Wreath - To make this card I used a woodgrain card highlighted with Copper Lusious Pigment power mixed with water. I then stamped onto it using the Laurel Leaves Stamp set. The wreath was coloured in using pens and Luscious powders.White ribbon was coloured with Post Box Red English Garden paint which is brilliant on fabric. The sentiment comes from the same stamp set.


For this card I used a Stamp Set from last years christmas collection and one of this years New Stamp Sets called Shine Bright  for the lightbulbs which I stamped on Shrink Plastic.
This is another Christmas Stamp from Last Years Christmas which I used to make a shaker card.

I hope you like this New Christmas Collection as much as I do. You can catch up with Kay on Hochanda this weekend and check out her hints and Tips for using these sets. Also check out the IndigoBlu Blog for more inspirational cards from the Design Team.
Happy Card Making xx


Christmas Stag 


Deer Forest


Christmas Wreath


Tuesday, 13 June 2017

Dirty Paint Pouring!

Hello everyone, 
I haven't been blogging for a month or so but I have been crafting making samples up for the IndigoBlu shows on Hochanda and in the last couple of weeks for Louise Withers who has been on Hochanda with Ecoline Inks. That is another blog post to come soon..............

I think I have now found a craft that is fast becoming a favorite for me.  This is the way I have been doing my pieces, and at this stage i'm happy with the outcome. There are lots of ways to do this technique but today I'm showing you how and what I have done.

Paint Pouring and Dirty Paint Pouring

So what is Paint Pouring and Dirty Paint Pouring?

Quick version-It's mixing Acrylic Paint with a medium that helps the paint flow and leave a glossy finish to your piece. You also add Silicone to the mixture and that's what gives you the cell like structures you see in the photo above as it separates from the paint, pushing its way through the paint.
If you like the big cells don't mix the silicone in to much. If you want lots of tiny cells, mix the silicone in better.
Paint Pouring is when you pour single colours out onto your surface. Dirty Paint Pouring is when you add all the colours into one cup and turn it all up on the surface!

Materials needed
Acrylic Paint
PVA Glue
Silicone
Wooden lolly Sticks
Plastic Shot Glasses & Party Cup
Yupo sheets
Foil Tray (or use a craft sheet or Baking Parchment)

I have been asked by several people how I have done mine so thought I would put this quick photo tutorial together. I hope it helps you if you want to have a go yourself and there are tons of videos on Youtube to learn more.

For this tutorial I'm using those small plastic shot glasses as I'm only doing a small piece on Yupo paper. (In fact I was able to cover Three pieces of Yupo with the amount of paint solution I mixed)!
The Yupo paper is 100% Polypropylene so it can take the wet glue and paint without bending and curling. If you are doing this technique on a canvas you will need more of the paint solution to cover the canvas so mix up your paints etc in plastic party cups or those polystyrene cups like ones as I used to do the dirty pour at the end.

To start with choose your colour paints. I went with shades of blue's and a white, all from IndigoBlu. I used PVA glue as I had some here but I know there are other liquids you can use such as Floetrol, but for this tutorial I'm keeping it simple!
So the first step was to fill the shot glasses up to 3/4 level with PVA Glue.


With a wooden lolly stick take some paint, you don't need much (See photo) and stir the colours into each pot

When mixing try not to make too many bubbles. Once the paint and glue is well mixed, add some water to give make the mixture the Constancy, slightly thinner than single cream.
Lay your Yupo into the foil tray 

Using Silicone in your paint mixture is what gives you the "Cells" when you pour the mixture out.
(The Silicone I have comes in a spray can, so instead of spraying straight into the cups, which can cause bubbles and you can't see how much you add,  I sprayed some into a small bottle. Be careful when doing this as you can see the vapours coming off the spray and also it could bubble out over the top of the bottle. Also just so you know the bottle becomes very cold to hold).

I added 10 drops to two of the coloured cups, and five drops into the other two colours. Stir in.  I didn't put any in the white paint as white always sinks to the bottom of the cup. You just want the colours to push their way through the white.

Add the paint mixture in layers to larger cups.
(I poured the mixture into two different cups as I was doing two pieces. As it turned out I got three pieces out of the mixture I made).

I used double sided tape to hold the Yupo down as you will need to tip the tray to cover the Yupo. You might need a spatula to pick up some paint from the sides to cover white areas once you have done the pour. Be careful not to mix the colours when scooping up paint.

So what you are seeing now is a Dirty Pour!

Once you pull the cup up, this is what happens. How cool is this.

Tip the tray in different directions to cover the surface of the Yupo.


So I did two Pours with the blue paints

As I had paint left over I added some Red and Yellow to two of the pots to have a different colourway.

This time I poured all the mixture into a cup but poured it out as I wanted to control where it went.

Each time you do one of these they are so different. 

You will need to leave your creations to dry on a flat surface. These took about 24 hours to dry. Just check underneath your piece as well as the mixture does run under.
Once dry the colours did get darker. Not sure if it because of the glue I used.
Once fully dry you can cover your creation with varnish or resin to protect and give it a high gloss finish.
I hope you have found this tutorial helpful and you have a go for yourself. Its quite addictive.

I have also used inks instead of paint which gives a lovely translucent look.

OK, so I'm off now to do some more experimenting.
Happy Crafting.