Showing posts with label Die Cutting. Show all posts

Sunday, 3 January 2016

IndigoBlu Blog Challenge Inspiration piece

Hello there and welcome back to my blog and a even bigger welcome to you if this is the first time visiting. 
Today im super excited to share with you an inspiration piece I have been asked to create for the IndigoBlu Blog Challenge "All that Sparkles".
For me it is such an honour that something I have created should be picked, not once but twice. (but that winners badge is still alluding me though lol)! 


My thoughts for this piece came from a photo I took on holiday with the sun shining on the sea. It looked like diamonds floating and sparkling on the water.
 Well that image didn't quite work out, but this is what I did.
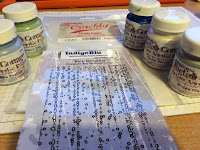
                                               

I wanted to do background stamping that would show up under the colours of the sea so decided to stamp on thick tissue paper so once the piece was finished it could be hung up at the window so the light would show all the details up.

The first layer of tissue paper was stamped with a blue Stazon ink, horizontally with  "Rain Droplets" stamp, then three more pieces of tissue paper were painted with a watered down coat of the IndigoBlu English Cottage paints. Sleeping Beauty, Snow White &  Peppermint Tea. Another sheet was stamped with FlitterGlu and "Bubbles Background" in Sheffield Steel Mega-Flake whilst the painted sheets dried out..
The sheets were then all ripped up into strips and glued over the base sheet using crystal effects as well as some material type chicken wire mesh.


Two more sheets of tissue paper were stamped with the Rain Droplets stamp in FlitterGlu and Stampendous embossing powders, which were also ripped into strips..

The Fish, Seahorse and Wave images from "Under the Sea" were stamped onto card, cut out, coloured, glittered or flaked to give them sparkle.


The next step was to die cut some leaves that look like seaweed to use to decorate the hanger for the window picture and also something for the Seahorses to hang onto. Some were cut from green and white card and vellum which were then painted using H2O's.


 A frame was cut out of two pieces of black card so that the tissue paper could be sandwiched between them. The inside edges of the frame were given a Mega Flake makeover with Royal Peacock.
I wanted to make something the picture could hang off, so I pulled out some Kraft card, ran it through a wood textured embossing folder, rolled it up and wrapped it in twine and the material mesh then covered the front with the seaweed. The idea was for it to look like a piece of driftwood. Thick twine was then threaded through a couple of punched holes in the frame and tied around the drift wood.


To finish off the the picture I added some clear gems for extra sparkle.

So why not have a go yourself and enter this months challenge. You could win yourself some stamps or be picked by the Design Team to do your own Inspiration Piece! 

Have fun & Happy Crafting.
Sue xx

Below are a couple more photos. 
Apologies for the lack of clarity in these photos. I wanted to show you what the picture looked like against the window but the the weather is so dull outside that I couldnt really pick up the details on the camera
.


Sunday, 20 September 2015

A little pot of 'Wow' - Brusho Crystal Paints

Hello to you and thanks for stopping by.
A few weeks ago I purchased some little pots of Brusho's and I have been having so much fun with them.


So just to remind you, this is what they look like. 


For anyone who hasn't heard of these yet they are a unique, transparent, highly pigmented water-colour ink crystal powder. They react with water so they can be used in so many different ways. They are permanent so a word of warning, don't get any on your clothes and be prepared for inky fingers!

I wanted to know at a glance what each colour looked like so I punched out a small scallop circle, used double sided tape to attach one scallop to each little tub, then took a pokey tool to make 2/3 holes in each tub. (Please don't be tempted to take the tops off the tubs as the powder is so fine, one sneeze and it will go everywhere)!
One or two taps on the upturned tub will result in some of the powder coming out. I mixed this with a little water to get the colour to paint the scallop top.

Using Brusho's is so easy to make quick backgrounds for cards. Just sprinkle powder onto card (I used different types to see what the effects would be on watercolor paper, Glossy card and Stampin Up Whisper White Thick card stock), spray with water and watch the magic happen!

                                     
Once the backgrounds are dry you can stamp on them, I used StaZon Ink, and add decorations. For the card above I used Die cuts, and the card below I stamped the poppies then painted them in with the red Brusho paint slightly watered down. Once this was dry I went over the poppy heads with crystal effects and added little yellow beads into the centers of some of the heads.


This was a mini Canvas frame I sprinkled Brusho's onto and sprayed with water. Once dry a flower was added along with some gems.


Another way is to add the Brusho's to embossing paste to create a new colour for your project using masks!


                As I said, you can do so much with these little pots, you just need to let your                                                                                         imagination flow!


                                                                          Happy Crafting xx


Thursday, 30 July 2015

Inside Spinning Card

Hello Everyone, Thanks for stopping by.
I can't believe that we are at the end of July! Where has the last month gone?
Mind you its been pretty busy here, what with my youngest daughters graduation and my son moving flats.
So I have two cards to share with you today. One was the card I made for my daughters graduation and one for a Card Swap group I am in, although the lady who was running the group has decided to finish running it now! Such a shame as I have met some lovely people through the group! I hope we keep in touch even if we aren't swapping cards each month!
So here are the cards I have made recently!


This is the Shaker Card made for my daughter.


Here is the second card, an Inside Spinning Card.


The inside of the card was decorated with a few different Stampin Up sets.
Perpetual Birthday Calendar, Dotty Angles and Circle of Spring. I also punched out a few tiny flowers and added pearls to the centers!


The main spinning image was two of the wreaths stamped, coloured then cut out using the die from the Wonderful Wreath Framelits die set. These were glued together sandwiching a piece of clear thread between them.
                            

Well im off now to play with my new set of Brusho Colours. Will let you know how I have got on with them over the next few days.
Happy Crafting xx


Monday, 8 June 2015

Circle Magic Slider Card

Hello there, thanks for stopping by. Its beautiful day here in Gloucestershire, the sun is shining and we have picture postcard clouds in the sky!
Today I have a Magic Slider Card to share with you. Children really love these types of cards, but I think they are pretty clever too.
I made this card as a Swap for the Challenge Swap Group I run on Face Book. Most of the ones I have seen tend to be rectangle so I decided to have a go at a different shape. 


Being a circle brought up lots of different issues in making the card but I think I have managed to pull it off. I also mounted the Magic Slider onto a round card blank so that it is fee standing!
The Magic Slider card itself is made out of a 12"x 12" piece of Stampin Up Irresistibly Yours specialty designer series paper which I coloured using two different inks. The stamped image is again from SU a set called "Moon Lake."For this style of card you need to stamp the image onto white card as well as Acetate and colour-in the image on the white card.
The butterflies stamps were coloured using marker pens then stamped onto white card and punched out! A couple of gems were added to highlight the bodies! I also made the fern flourish with a mold and crafters clay.


Thanks for stopping by, please visit again soon.
Happy Crafting xx


Tuesday, 28 April 2015

Easel Card -Video Tutorial

Good Evening Everyone,
Well its a late night blog for me today due to the time it has taken me to upload this video! Unfortunately where I live the internet is really slow and trying to do anything after 3pm is a nightmare! 
Anyway, onto the Tutorial. I hope I have given the beginners to Card Making enough information as well as a few ideas for you hardened crafters!


The Video tutorial is for a card I shared on Facebook yesterday and I had lots of really positive comments about it! Thank you!


For those of you who have just started card making, or who haven't got the Die I used in my Video, I have put together a 'Make it yourself' kit. 
It comes with everything you will need to make the card except for Glue and your time! (and of course there is this video for you to follow)!

I can customize the kit to suit your colour choice. Just drop me a message and we can take it from there! (birdcagecraftstudio@hotmail.co.uk or Via Facebook)!

£4.00 per kit including P&P (UK only)
Payment through Paypal please!


Here are a few of the Cards I showed on the video!


I hope you have enjoyed this post! 
Please leave me a comment and come and visit again. xx


Sunday, 26 April 2015

My Card Swap Shares!


Happy Sunday Everyone!
I have a couple of cards to share with you today. 
The first card is one I  made for last months Swap Group I run on Facebook and it was all about 'BLING'! 
We also had to make a card that has its own stand!
Well, i'm not really a Bling Girl, but this is what I came up with. I was quite pleased with the way it turned out in the end!
(Next months Challenge is using those free Paint Chips you can get home decorating stores. Why not pop back and check out my ideas)!


Making the Card Base!
Back of the card!


Close up of the 'Bling'

OK, now onto the 2nd Swap!
This month we had to create a card using Neutral Colours as a tribute to a lady who sadly passed away and who used to love these colours. Also it would have been Margaret's birthday this month!


Side View of the Card
Close up on the front of the card!


Front View of the card 

Thanks for stopping by. 
Come back tomorrow for my Video tutorial on how to put the above card together for yourself!
Happy Crafting xx