Showing posts with label Stamping. Show all posts

Sunday, 17 February 2019

Hello 2019 !

Hello there and Happy New Year to you! 
Yes I know, how bad am I as we are now in February! 
It's such a shame but I'm wondering if people still read blogs as much as they use to. Sometimes I'm adding something to the blog and I wonder how many people will read it and leave me a comment. I love to share my crafting goings on but without any interaction from readers I really do wonder if its worth it..............
Anyway I thought, give it another go and see what 2019 brings.

So I will start off this years blogging by sharing some Artist Trading Coins (ATCoins) I have created to help inspire members of the 'I Love IndigoBlu' Facebook group as we are going to start a new swap starting on the 20th February. So if you are already a member then why not join in. If you are not a member but are interested please come and join us!

The first step for making one of the coins into a shaker ATCoin is to decorate a piece of white watercolour card stock. For this I mixed up some of the new colours of  Luscious Powder (Peacock, Bulfinch & Quail) with some tepid water in little spray bottles, then lightly sprayed the card. I sprayed two colours then dried the card then went back in with another of the colours. 

 I used my stamping platform and black Tonic  nuvo Hybrid ink so that I would get a better stamped impression of the New IB stamp Open your Heart over the sprayed card stock.
 I then used a 2 1/2" punch (You can also use a Die or draw around a glass if needs be) to punch out the front of the coin.
I then punched out 5 more 2 1/2" card circles with a 2" aperture punched out from the middle creating boarders to layer together to use instead of foam tape. ( if you have any funky foam you could use that to create the depth needed for a shaker card). 
The Collectors Edition Stamp no 23 Artist Trading Coin was stamped and punched out to use as the base of the shaker.
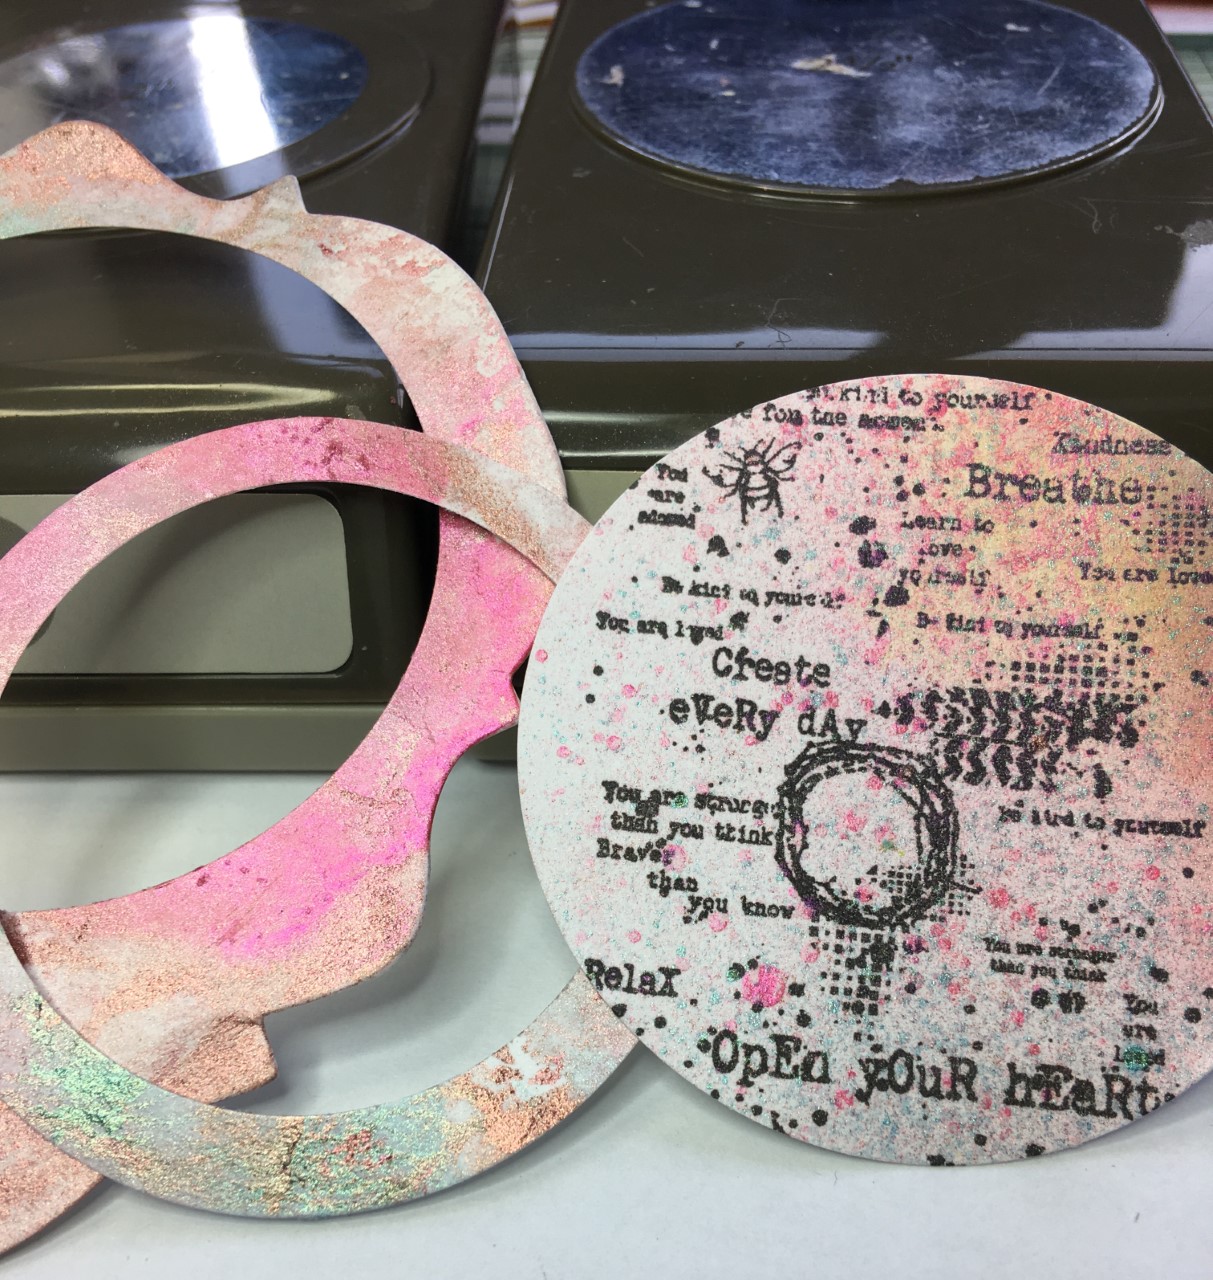
 From another piece sprayed card I punched out a boarder (done as above using the 2 different size punches).

 A circle of acetate was glued onto one of the white boarder pieces and then the coloured boarder was glued on top to create a lid. The remaining white boarder pieces were glued and layered up.
 The stack of boarders were glued to the shaker base making sure glue hadn't seeped though and two of the NEW colours of the Textured Art Stones were added inside to create the shaker. (Glitter or small beads would be good for this as well). The Acetate top was then glued into place.


 To create the other two coins I used Distress Oxide inks to create a background of colour first on watercolour card. The first coin was then stamped in green ink using the Calm and Relax stamp and the Peacock Luscious powder was mixed up with some the Super Thick Slap it on then put through part of the Moroccan Tile Stencil
The last coin was stamped using the  Fandangle Feathers, and using the Basket Weave Stencil Bullfinch Luscious powder was mixed up in the Super Thick Slap it on to create extra texture.
Extra details were added to the coins and I got to use one of the New Jane Davenport Gold Pens I purchased from the IndigoBlu shop. 
I have to say I'm loving using all of the above craft items.
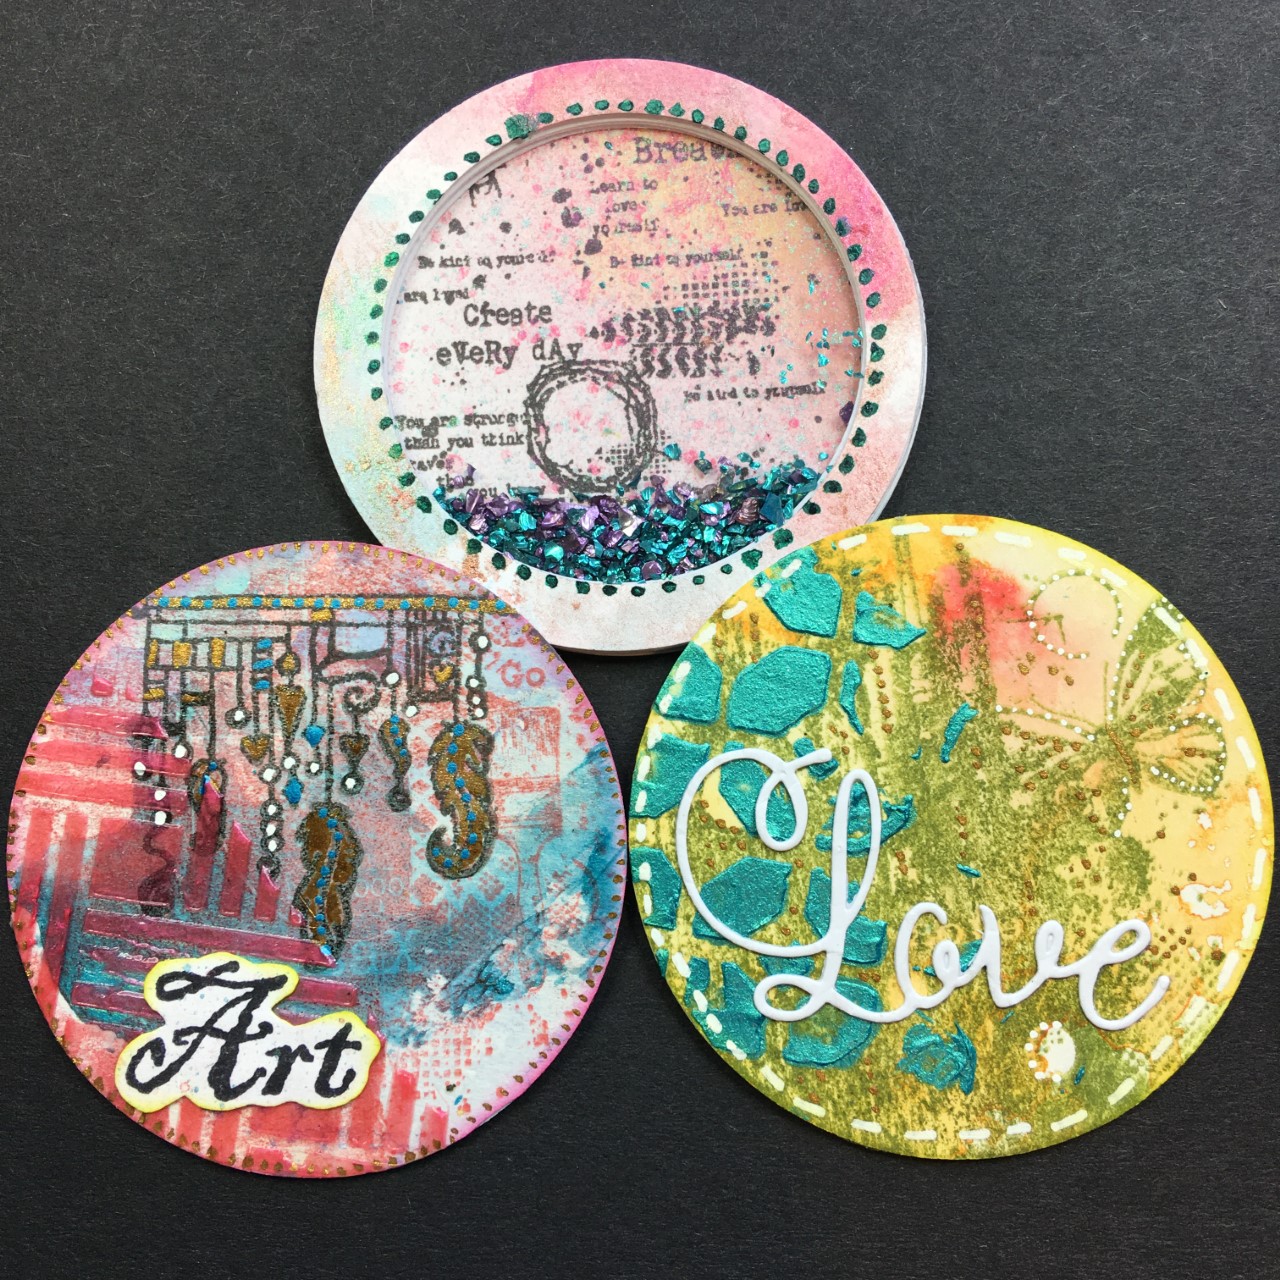
So there you have it. ATCoins and one of them being a Shaker Coin. Enjoy.
Thanks for checking this out.
Happy Crafting and Swapping,
Sue  xx


Wednesday, 30 May 2018

IndigoBlu inspiration for Fathers Day Blog Hop!

Hello there and Welcome.  
I'm very excited to share this blog post with you today for two reasons. 
The first is that I'm taking part in a Blog Hop with some of the other fantastic IndigoBlu DT members and secondly Kay and Alfie from  IndigoBlu are offering a huge 20% discount on a range of Stamp Sets the DT have used for their Fathers Day Cards. 
Of course these stamp sets can be used for so much more than just once a year, think of all the different projects you can create with them.

Below are the stamp sets with that huge 20% discount. Just use the Code FD20 on the IndigoBlu website to claim your discount. Vaild up to 17th June 2018.
For my Fathers Day or 'Special Man' card I decided used Drive Hard, (because my Father loved the vintage cars), Fly High and Design Alphabet as unfortunately I don't have the Circus Alphabet.

Step 1. Kraft Card Stock was cut to 12"x8" and scored at either end at 3" to make a Gate Fold Card base.


 I then used the Cogs and Gears stamp from the Fly high set to create a background on the card base
Versafine Sepia ink was then blended over the stamped images

Step 2. The Vintage car from Drive Hard was stamped out onto white card and clear embossed.
 The car was then cut out and and painted using Kingfisher Blue and Pheasant Bronze

Step 3. Chocolate card stock was cut to 4 1/2" x6 1/2" to make the first layer of the card. This was stamped with the Tyre Track stamp set Drive Hard using the Portrait Paint
 I then decided more colour was needed so used the same colours as in the car

  Step 4. I die cut a tag in Kraft card and stamped over it with the cogs and gear stamp then out came the Chocolate Box Meg Flakes to edge all of the card pieces

Step 5. Using the Sepia ink again I stamped out the word 'DAD' onto cream card from the Design Alphabet stamp set. The letters were cut out and mounted using foam pads onto Chocolate card stock which was edged with Kingfisher paint.

 Step 6. Now all the layers were put together. 
The tyre track layer had some copper wire wrapped around it towards the bottom, (you can see this better in a photo below) and then the left half only of this panel was glued onto the card base so that the card still opened. 
The letters were attached to the tag by first wrapping some wire around it then I glued the tag into place over the tyre panel.

Step 7. The car was then attached to the tag using foam pads amd I ran a grey marker around it to create a shadow. 
A piece of cream card was cut out and attached to the inside of the card base ready to write a special message.

This card was fairly easy to do so thought it would be a great way to help children make their own Fathers Day Cards. 
I know some of my crafting friends love to help their Grandchildren make cards and I think this would be a project both adults and children would enjoy doing together.
 These photo's show up some of those little details

  In this photo you can see how the wire was wrapped around the first layer

Many thanks for stopping by to take a look at my Fathers Day card, but before you go,  please hop over to my Teamies Blogs to see what they have been creating and of course, don't forget that Big 20% off deal from IndigoBlu. 

You have until 17th June to claim it using code FD20.

Now for the Hop!
Kay Molyneux- One for the boys!
Carolyn Larkin -Steampunk Fathers Day Card
Linda Simpson - Fathers Day Inspiration
Julie Atkinson - Fathers Day with IndigoBlu
Aitch - Fathers Day Blog Hop
Emma Blake - Fathers Day Card and a Special offer
Until next time
Happy Crafting x


Sunday, 21 January 2018

Trying something new for me - ATC Swapping

Hello there. I thought I would write a quick blog post to share with you my latest crafty makes,  ATC's (Artist Trading Cards).  
The Junk Journal Junkies and Mindful Art group on Face Book runs one each month and now that my partner has received her cards I can share them with you.
Although I have seen these type of cards before I haven't made or swapped them before and I have found them to be a lot of fun to make.
. You work on quite a small size card 2 1/2" x 3 1/2" so its not as daunting as working on a larger blank surface.
The theme was the letter E and you could use any products you like to create your card.  
I choose to make 3 to start off with, but some people in the group can make up to 6. 
I thought I would make 3 completely different cards but I know some people like to make up a Master board (of A4 / A3 size card) of paint and stamped images then cut it up as the  base for the ATC and use slightly different embellishments or stamped images to decorate.

 Here are my  ATC's for the letter 'E'
 Top ATC- I was just going to do a mini Envelope but then thought why not make it an Easel ATC as well.Then 'E' for Elixir and 'E' for Engagement. I even made a little pink diamond ring.

Here are some close up of the ATC's.
For this one I had used Rice paper decorated with inks and stamped images. On top of that layer I stuck down some stamps and stamped images over them. I made a tiny envelope out of vellum and ran it through an embossing folder. As I had made this into an Easel ATC so I stamped and punched out flowers to make a Stop for the card.


I first of all decorated the base card with embossing paste and dripped pink and silver paint over the card. Once dry I added some ribbon to the bottom half then stamped out an image of a couple and sentiment. White and silver thread was wrapped around the image and tiny painted punched out hearts were placed down the side. The engagement ring was made out of a  jump ring and a glass bead.


Coloured blocks of inks decorated the first layer on this ATC. I then built up further layers using some G45 papers, cut out and coloured two bottles then made the middle bottle out of acetate which I coloured and added glitters on the inside of the bottle. I found a label with the word 'Elixir' and attached it to the bottle.


I hope you have enjoyed taking a look at my latest makes. Thank you for popping by and if you have enjoyed seeing my crafts please subscribe to my blog so that you get updates of when I post.
Have a great week,
Happy Crafting, Sue xx


Tuesday, 21 February 2017

Love is all you need- IndigoBlu Blog Challenge


Hello there, for this months inspirational reminder I decided to use a Beatles song to make a card that looked like a LP with lots of funky bright 60's colours and hearts. I thought using the New Mini Mike stamps might be fun for this. (Unfortunately my husband didn't agree, he thought it was the village people)! Anyway I had fun creating this card as I love lots of bright colours myself.
If you would like to join in the fun you can find the challenge details here!


I started this card off stamping the Dinkie'Love Is' heart several times onto a round piece of white card.

I then went onto stamping with the 'Circle Dot Background'and painting the hearts with Marshmallow coloured paint.

I then brought in lots of the bright coloured paints and did some more stamping of the circles over the top.

I added some flowers for 'Petal Power' and coloured in the rest of the circles. I stamped out four Mini Mikes and used the paints to colour them in.

I then attempted to give the guys a 60's look with a different hairstyles and mustache.

For the quote I used the word 'Love' from the stamp set Words Block #1 by just using a black marker on the word love and stamped and cut it out. For the other words I used my DYMO word printer machine.


I then used a grey marker around the Mini Mikes to make them pop up a bit and mounted the card onto a larger circle of black card.

I then thought I really should add some musical notes so stamped a few from the Dinky Stamp 'Notes'

Well thats all from me for today. I had quite a lot of fun putting this card together and I hope that you have a go at this months challenge.
Happy Crafting xx


Sunday, 4 December 2016

Glisten & Sparkle above and below the sea!


Hello Everyone, i'm back today with a inspiration piece for the IndigoBlu Blog Challenge called Glisten & Sparkle.
My first inspiration piece was a Christmas Card and i'm guessing that's what most people would think of doing so near to Christmas, but this time round I wanted to do something different.
Martin and I went traveling around New Zealand at the beginning of the year and one of the things I remember most was the times we spent by the sea and lakes and the way the sun shone on the water making it look as if there were diamonds floating on top and the way the sun shone through the water into the sea so I thought I would try and show this in my inspiration piece for Glisten and Sparkle. 


As my idea was set around water I pulled out the IndigoBlu stamp set 'Under the Sea', and stamped the images onto Acetate with Black Stazon and painted them with most colours of my Luscious powders mixed with some slap it on. (This helps the colour adhere to a slick surface such as acetate).


With the frame im using I gave it a coat of Gee-Soo Good in white then when it was dry I painted the frame with Blue Luscious Powder and added Sheffield Steel Mega Flake in patches. 


I used a sea-life mould with paper clay to make some embellishments to give the picture a more 3D feel.

Stamped images and die cuts were added to the background piece of card coloured with inks then that was overlaid with stamped and coloured images on acetate.
The acetate waves were highlighted with the SS Mega Flakes in three layers then small diamond gems were added.

The acetate layers were wrapped around the base card in a slight dome. Once all were attached I put this into the frame then added a sentiment at the top of the frame and added a little bottle with a message to the bottom of the frame along with more acetate images.


Many thanks for taking a look. 
Sue xx

Don't forget if you long on to the IndigoBlu blog page not only will you find all the information for the current and past challenges but there is also an online shop.


       Gee-Soo Good (White)                 Under The Sea

Luscious Powders