Hello there, hope you are well and enjoying your crafting.
I found out about Dirty Pours, yes that really is the name for one type of Acrylic Paint Pouring, quite by accident on You Tube and now I'm hooked.
Before I go any further I just want to explain what a Dirty Pour is!
When you have mixed up the colours you want to do a pour with, you get yourself a empty container and start to add those different colours in layers in the container. Simple as that. By adding the colours together you get whats called a dirty pour as the colours blend in part to each other making new colours.
What I then enjoy doing, is to 'Flip' that cup over onto the canvas, giving the paint a couple of minutes to slide down the cup then lift it up to see the paint flowing out. You never quite know what will happen!

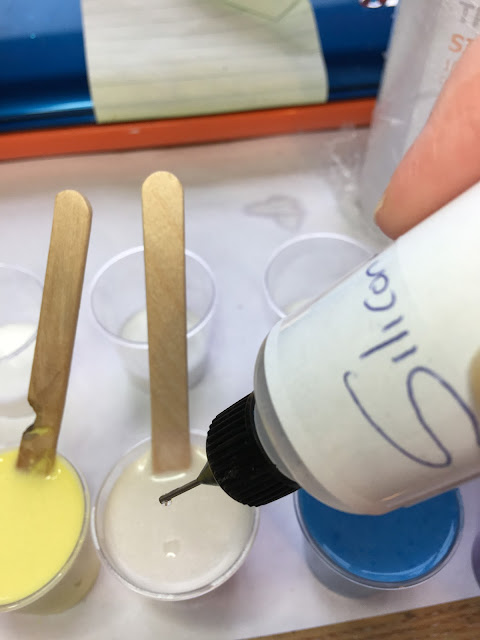
This photo shows that once the single colours have been well mixed with the PVA Glue, water a little Floetrol and a few drops of Silicone oil they are then layered up into what now becomes a 'Dirty Cup' of Acrylic paints.

The Dirty Cup is then flipped on top of the canvas and left to settle.

Then the cup is lifted up. I never get bored of seeing this step. New colour emerge, you never quite know whats going to happen!
Over the last few weeks I have been experimenting with a few different techniques and materials so thought I would share a couple of these with you.
Now most people know I love the IndigoBlu products so of course have quite a few of their products so used these in my 'experiments'.
The first one I have to share with you is using the IndigoBlu Super Thick Slap it on, watered down and used instead of the PVA glue. Now this medium has been produced to use through stencils and multi media work so although watered down it kept a thicker texture so pouring this with the acrylic paints produced a thicker pour that held its shape and needed a little bit more persuading to flow across the canvas.


The Super Thick Slap it on has been mixed with water, just enough to drip off the lollystick

A dollop of paint has been put into mixing cups. Love these colours together, very autumnal!

I first of all mixed the paints with a dash of Floetrol which helps the mixture to flow better.

I then added the Super Thick & water mixture

Once thoughtly mixed I added 3 drops of Silicone to each colour of paint

I then poured layers of single colours on top of each other into a spare cup

This was the outcome when the cup had been flipped and pulled up. I wasnt so keen on all the brown so I tipped the canvas this way and that until I was happy with the other colours that came to the top. You may well have also noticed there were a lot of bubbles in this mixture. I managed to get rid of a lot of them using the torch but think because I used a thick medium it held on to some of them.

I then tillted and moved the canvas until it was completly covered with the paint mixture. You can see the cells forming.

This canvas took about 3 days to dry out before I was able to varnish it. As you can see over that time the colours did change slightly
So the next experiament I carried out was to use the IndigoBlu Luscious Powders to see what would happen.
 So to start this experiment I added some Luscious powders to a small drop of Floetrol and mixed the powder in well
 I then topped up each shot glass with PVA glue and mixed this in together. One of the things I have learnt is that you really need to mix things in well
 Once mixed I added 4 drops of Silicone oil to each of the colours but not the white
 I then has a spare shot glass at the ready to pour in layers of the Luscious mixture
 Here are the layers of those Luscious colours
 When I had flipped the cut over it reminded me of those sand bottle you often see in souvenir shops abroad.
 This mixture poured really well, just look at those colours and the shine was brilliant.
 After an hour the colours were blening more together than the paint normally does but the cells were still visable.
 So after a week of drying out this is what the Luscious Powder pour looked like. You don't get the same depth of colour you get from paint but a lovely shiny, yet muted finish.
For each of the pours I had Paint or Luscious mixture left so tried pouring it on different surfaces. I have to say pouring on anthing other than a flat surface will take some practice, I have a lot to learn lol!
I first tried pouring onto Dura-lar and it worked really well. It took almost a week to dry out though so its not a quick process but im hoping I can die cut this place for some card making.


 Next I tried using the Metallic paints mixed with PVA Glue, a little drop of Floetrol and Silicone.


Next I used what was left of the mixtures to cover some small clay faces I had made using molds.

 Paint and Luscious covered faces
 Paint Pouring over Paper Mache. I first of all covered the face in white Gess-Soo-Good. Because the face is a curved surface you need to be patience when pouring as the paint flows off the curves. Next time I do this I will make the paint mixture a little thicker.


For each of the pours I had Paint or Luscious mixture left so tried pouring it on different surfaces. I have to say pouring on anthing other than a flat surface will take some practice, I have a lot to learn lol!
I first tried pouring onto Dura-lar and it worked really well. It took almost a week to dry out though so its not a quick process but im hoping I can die cut this place for some card making.


I also used some small wood pieces I had. I painted them with Gee-Soo-Good first of all so that the mixture wouldnt soak into the wood.
Look at the sparkle in that Metallic paint!
They look so cool when they are first poured but went quite dark when dry.

 Acrylic Paints
That's all for today but i'm still experimenting. Hope to have more to share with you soon.
If you haven't aleady seen my other post on Dirty Pours here is the link
To learn so much more about this adictive craft check out the videos on Youtube. Some very talented people out there!
Happy Dirty Pouring xx
Look at the sparkle in that Metallic paint!
They look so cool when they are first poured but went quite dark when dry.


That's all for today but i'm still experimenting. Hope to have more to share with you soon.
If you haven't aleady seen my other post on Dirty Pours here is the link
To learn so much more about this adictive craft check out the videos on Youtube. Some very talented people out there!
Happy Dirty Pouring xx
This is fantastic Sue and extremely informative. The new kit from Indigoblu will be so easy for everyone to use. I've been watching YouTube this evening to see some different techniques and can't wait to try them out. I saw one the poured onto a large pebble which looked interesting but when it was dry lost most of the cells. I do like your clay faces and will have to try Luscious too xx
ReplyDeleteThank you Carolyn. There is so much scope when using this method. It is a shame when they dry darker than expected xx
DeleteThanks so much for sharing this sue ..its going to be really helpful over the next days becsuse i can keep referring bsck to this ...sue is their anything else i can use until i get floetrolxxx
ReplyDeleteHello Natalie, so pleased you found this helpful. I started doing pours with PVA glue before I moved onto floetrol xx
DeleteSue youve made my life ..r em needs a purge mask for halloween but not just a cheap plastic 1..with all your amazing tutorials and your generosity i can now make them for her ..i really cannot thank you enough for all this ..love you so much i loved you tons yesterday but love you extra tons today ..thank you thank you thank you so much lovely xxx
ReplyDeleteAwww, thanks Nat. I hope the mask works out well. xx
Delete