Sunday, 31 January 2016

"Anything Goes" IndigoBlu Blog Challenge (My Valentines Spinning Card)!


Hello Crafters,
Its that time again to get busy crafting and add a project to the IndigoBlu Blog Challenge.
Pretty much Anything Goes this month, just make sure you create something with the IndigoBlu stamps! 
But why stop there.......................

For this project I have used IndigoBlu Paints, MegaFlakes, Stencils and of course a couple of Stamps.


I have put a video together to help show you how to make this style of card. 
There are also some written instructions below.


First of all I painted a piece of card-stock using the English Cottage Artist's Acrylic Paint in Postbox Red then once dry, stamped out the Poppy Heart, first in Black Stazon ink then with FlitterGlu over the top of the black image. Lancashire Mega Flakes were then used to highlight all the details.
A  5  1/2" x 5  1/2" piece of white card was cut out and a 2  1/2" circle cut from the middle. I then used a stencil and stamp to put down some coloured layers without adding extra depth to the card which would stop the circle from spinning.

A  6 1/2" x 6 1/2" card base had a border of black ink sponged around it.


The stamped panel was then attached to the card base with double sided foam dimensionals,   and a  1  3/8" circle was punched out of white card and was attached to the underside middle of the black circle with a couple of foam dimensionals.
TIP- Keep the dimensionals away from cutout circle as the could restrict movement.


 Two 3/4" card disc's were punched out and foam dimensional's were used to stick the disc's together for the spinning element (See below) then use another dimensional to stuck down this piece onto the middle of the black circle.


The spinning element was then used to attach the card base and the black circle together'


The finishing pieces for the card were the Word Tiles. 
These were cut out of a sentiment which was stamped out of card from the stamp set 
Live, Laugh, Love!


I hope you have enjoyed watching the video on the making of this type of spinning card.
Further down this post are a couple of other moving cards made using different stamp sets.


Until next time!

Take care and have some crafting fun.
 xx


Thursday, 28 January 2016

Flying Butterflies

Well "Hello there"!
Today I have a quick blog post to share with you. As some of you may have read before I am part of a Card Swap Challenge group on Face Book and the challenge this month was to create a card using embossing along with shaving foam prints.
Now, if you haven't yet had a go with shaving foam you really must, its such good fun. Its a bit messy and you might need to wear gloves but you get some great "one off" designs.

Here is a link to a video tutorial I did a couple of years ago.

Now to show you the card I made for the swap. 
Its a box card so it folds flat for posting, but once out of the envelope you open the card up and it becomes a 3D card.
The box itself has panels of embossing on it and the butterflies were attached to thick acetate to create an illusion of them flying.
I punched out little flowers and added a little bling (Rhinestones)!
I also made a matching envelope for the card to go in.


Thanks for popping by today, I will say cheerio for now and leave you a few other photos of the card to check out.

Happy Crafting,
Sue xx


Sunday, 24 January 2016

New Beginnings- Welcome to a New Crafter


Hello there, thanks for checking in today!
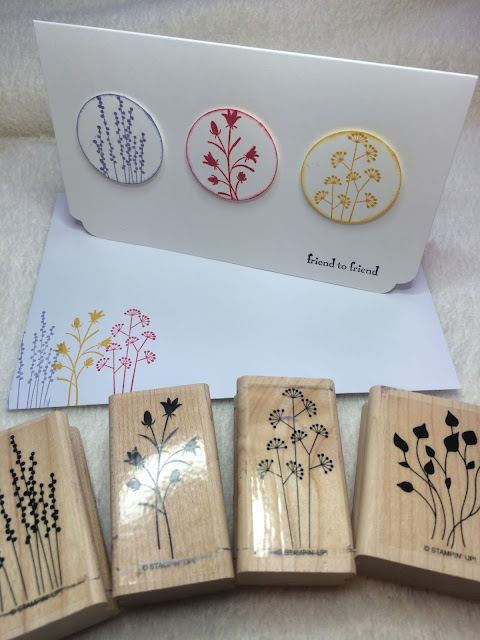
I'm back to share a couple of cards with you that I made using two older Stampin Up sets I dug up from the depths of my ever growing pile of stamp sets.


I had a one-to-one workshop with a new crafter and I wanted to show her what can be done with just a few crafting supplies.
Here are a few items I suggested she should get.

1. White Card Stock (for now)!
2. Stamp set
2. Black Ink Pad, (Possibly 2 or 3 other colours) or Pens to colour in the images
3. Sharp pair of Scissors
4. She already had a trimmer (but if you don't a cutting mat and craft knife)
5.Double sided tape and glue, double sided foam dots
6. Bone Folder
7. Pokey Tool
8. Scoring Tool
9. Ruler, Pencil & Rubber 
10. Sponge pieces or Daubers 
I also suggested she look for a craft magazine for some ideas and one that had a free stamp set with it to start her off. 

So the supplies we used were
*Stamps  (Unfortunately both sets are now retired)!
*White Card Stock-250gsm, cut to size
*Extra card stock for stamping & Punching out circles (You can cut out the shapes if you don't have a punch)
*Envelopes
*Coloured Ink Pads (or water based marker pens)
*Paper Doily cut up
*Bakers Twin
* Wink of Stella brush pen in Clear (Has a great sparkle)


For this card we stamped out 3 of the images from the stamp set onto white card, punched them out then went around the outside of the shape with a dauber & ink. 
The Wink of Stella pen was used to highlight the images
(apologies the camera didn't pick up the sparkle)?
Then we stamped a sentiment onto the card front before adding the shapes. We did this by using double sided Foam Dots
We also decorated a piece of paper as a liner for the inside of the card and also decorated the envelope.
TIP. Place your middle shape down first in the middle of the card. (The ruler was great for doing this)!


Much the same was done for this card. The images were stamped in the center of the card, highlighted with the Wink of Stella pen and a piece of doily was cut out and stuck over the very bottom of the images.
A length of bakers twine was added around the center of the card and a Bow was tied at the edge of the card.
A decorated liner was added to the card and the envelope was stamped on.
TIP. Draw a faint line across the card to help you line up the stamps.


Ok, for this card, stamp your largest image first, then fill in the rest of the card front with smaller images.
Stamp out a sentiment on an extra piece of white card, cut out and mount it on foam dots. Attach this to the middle of the card.
A card liner was added and also the envelope was decorated.
TIP Go around the edges of the sentiment with a coloured pen or ink to make it 'Pop' out


Thanks for stopping by, I hope this has given you some inspiration.
Happy Crafting xx


Wednesday, 20 January 2016

"Sticky Notes" have so many uses!


Good Afternoon one and all. 
What a cold frosty morning I woke up to this morning!
I have to say that the frost, although cold, is really beautiful. 
The spiders webs look as if they have icing sugar sprinkled on them, and when I ventured outside to top up the bird food, my feet crunched their way across the white & frosty blades of grass.
I think the rest of the day will be in my craft room looking out of my window to see if the sun can sneak through for a while.

Taking of crafts, here is a little project I made just before Christmas but been unable to share it with you until now.

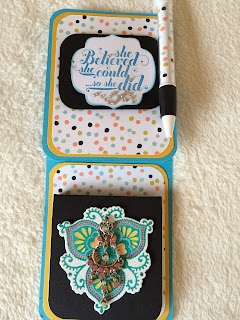
Sticky Note Holders with Matching Pens
Here is a way to use those little calendars you may have purchased and were not sure what to do with them all!


As you can see from the photo there are so many ways you can decorate these sticky notes. I chose to make a holder for them with a high back panel so that a pen could be attached so that you would have everything to hand, by your home phone or at work etc.
The pen for each of these notepads has been decorated with the same paper as on the holder.

I keep one in my craft room and use the sticky notes for :-

*Masking when I am stamping 
*Punching out shapes, say if I want to create a background such as a sunset or clouds in the sky.
*Use the sticky edge for holding your thinlits dies in place
*Use one to Flag a project /photo you have seen in your craft magazines, books

There are so many uses for these sticky notes in your craft space, let alone using them in your everyday life............................

You can make a bunch of these for very little cost and they make wonderful little presents or even send them as greetings cards with a little extra.
I have made so many of these to give away to both male and female friends and each time I have received really positive feedback.

Here are a couple of different, smaller designs I made using Stamps and Embossing powders to make the embellishments.


Hope you have enjoyed reading this post and give this idea a go for yourself.

Below are a few more photo's of the Note holders with pens. Don't forget you can decorate these in so many different ways. 
Raid your old jewellery, dig out some of those forgotten embellishments.

Have fun and Happy Crafting xx


Monday, 11 January 2016

Feeling Happy! CRAFT GIVEAWAY****NOW ENDED**** WINNER CONTACTED AND REPLIED!


Pulling the Winners name out of the Hat (Well Bowl)! Lol

Well done Michelle


Hi Sue, just wanted to say a massive thank you for 

the package of lovely goodies that arrived today. I'm

 so thrilled to have won your giveaway, and

 absolutely delighted with all the gorgeous items

you sent. I'm going to have so much fun. 

Love the card too, very apt sentiment x x


Happy Monday to you all.


Yahoo, 


Over the weekend I reached 100 craft videos! (I only realized this morning)! I have enjoyed 

making and sharing them with you all and I have lots of new ideas for craft tutorial videos

 so please keep checking back.

(Shh........The next one in line is a tutorial on the interactive cards I have been showing you. Not sure when, 

but really soon)!


So, a BIG Thank you to everyone who has subscribed to my  YouTube Chanel and left their 

lovely comments or thumbs up. 

I will also be doing another GIVEAWAY when I get to 1000 subscribers!(Hopefully soon)!


Now onto the fun bit

In celebration of this i'm GIVING AWAY some Crafty Goodness from a

few of my favourite craft companies. 


To be in with a chance of getting your hands on this giveaway please leave me a comment

   here or my Facebook page, or indeed on my YouTube channel.

This Giveaway will close on Friday 15th January @ 21:00


Check out this video to see more of whats on offer

Good Luck xx


Sunday, 10 January 2016

Latest Card Swap Challenge Cards I sent out and received

Hello Everyone,
Well what a morning we have had so far, pretty miserable with grey skies and rain. So I thought I would pop on here to share a couple of cards I have made and received recently.


The above card was one I received from Sue for the swap titled 'I'm dreaming of a white Christmas'
A stunning card with so many techniques used. The parcels inside are so cute!


This card was the one I sent out for the challenge. Lots of die cuts and of course IndigoBlu Mega Flakes and stamps.

The next challenge was 'New year Greetings'. I sent out two swaps for that challenge and received two back. 

The first card I received was from Liz and it was a Swing Card. I haven't made one of these
in a long time so to receive such a lovely card from Liz has made me what to make one again.


The above card was from a New Member of the group and this was her 1st time swapping. Its a gorgeous card Lisa and I love the shaker element to it. 
The silver balloon also moves around the bottom half of the card.

The two cards I sent out were very similar to each other and you can find out more about them in my latest video


Thank you for the great cards ladies, I really love getting Happy Mail xx

Also just to let you know I will be adding a few more crafting goodies to my shop, 
Stamp sets, Embellishments and Dies, so keep checking that out. 
Maybe you can grab yourself a bargain or two. P&P included in the price for UK post addresses. Here is the link  or click onto My Shop at the top of the blog page.