Hello there, WARNING. PHOTO HEAVY BLOG POST - but I really hope you enjoy taking a look.
Today I have a card to share with you. Its an interactive type of card that I hadn't seen before and found it when I was on Youtube. Here is the link to the channel I first saw this type of card.
It caught my eye as its a bit different and which I love, yet folds up to be posted so doesn't cost too much to send.
When making my sample up I did change some of the details as to what they did in the video.
I have kept with the name, Pull up Card but its also know as an Accordion or Lantern Card.
As I was quite taken with this card so used it in my FB challenge group and also for my monthly Craft group. The ladies all came up with some stunning cards.
Here are a few photos of the craft group in full card making mode!
Below are some photo instructions on how I made my first Pull Up Card and further down the post there are some other, slight variations. Enjoy.
Cut yourself 1 base layer in plain card 6 1/4" x 6 1/4" and 1 patterned paper layer a 6"x6"
Cut 4 strips out of white card measuring 2" x 12" then score at 2", 4", 6", 8" and 10" mark
Fold all strips into a concertina
Using your trimmer cut up
20 x 1-3/4" squares in the base colour card
16 x 1-1/2" squares in the patterned paper
4 x 1-1/2" squares in white card (These will be used for stamped sentiments)
Now to layer up those squares. Stamp your quotes onto the white card first then layer them up onto the base coloured card. Layer up all the rest of the base coloured squares with the patterned paper.
Attach all the squares to the 12" strips but leave the bottom squares as these are going to be attached to the base layer.
I kept all my sentiments in line but you could add them anywhere you want.
Next step is to turn your patterned base layer over and draw to lines to show the layer in 1/4's. This will help you to position those 4 concertina strips.
I used one of the 12" strips as a template to mark where each strip should should be placed equally.
Now glue down each 12" strip making sure the patterned paper on the strip is showing.
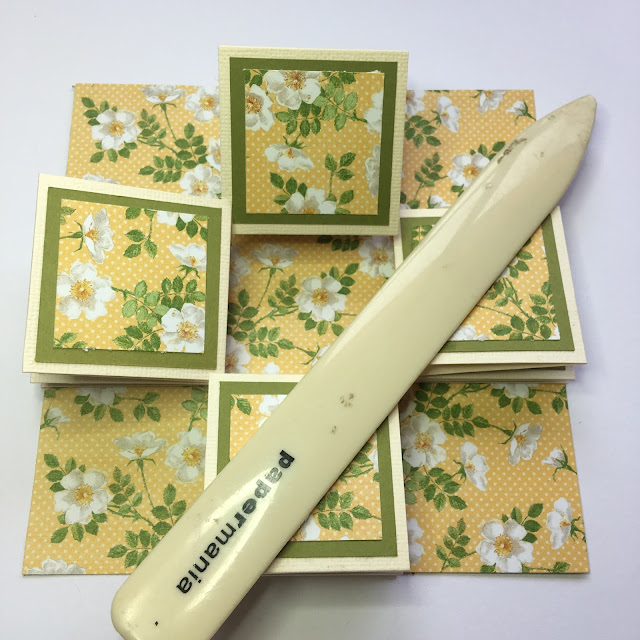
Once all the 12" strips are glued down flip over and concertina the strips again. Use a bone folder to get crisp folds.
Using the same coloured card, cut out 2 - 3 1/4 x 3/4 strips
Glue the strips together at the centre point of the strips
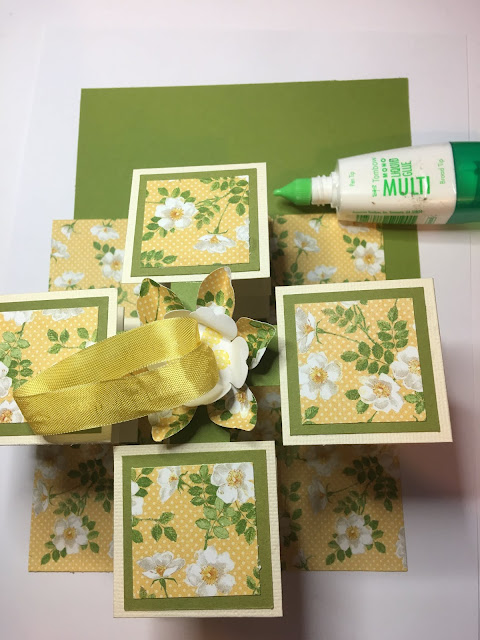
Punch a hole in the middle of the cross. This will be where the ribbon is threaded through later. Now lay the cross onto the middle of the patterned paper. I unfolded the strips and folded the strip back after the third square from the top. See photo above! This makes it easier to get the cross positioned correctly in the middle of the card
With a pencil, mark on the cross where each top part of the strip meets then you know where to put the glue to attach it to the strips. Don't glue anything down yet!
Use punches or die's to cut out three shapes. The flowers are to embellish the top part of the cross and the circle is to hide where the ribbon comes through under the cross. (see photo below).
Layer up the flower and glue into the middle of the cross. Turn over and using the hole in the cross as a guide, punch a hole all the way through the flower as well.
Glue two parts of the cross to two of the 12" strips.
With a 8" piece of ribbon, doubled up, thread the ends through the flower and cross as the photo above.
Separate and flatten out the ends of the ribbon and stick the ends onto the cross using strong double sided tape. Add some of the tape to the circle.
Cover up the ribbon ends with the circle to tidy everything up.
Stick down the remaining strips into place.
Cut out a piece of white card measuring 6"x6" and glue onto your card base so that you can write a message.
Turn the pull up card over and run some glue along the base piece of patterend paper and stick the card base down into place. Flip the card upright and make sure everything lines up.
And that's it! You can also add other embellishments to further decorate the card as I have done in the other style of cards I made below, and going on a little further you could also make an envelope or box for the card to go in.
Here are a few extra cards I have been making.
I would love to know what you think of these cards and if you have made one already.
Have fun and Happy Crafting.
Love Sue xx


Wow! That is amazing. I really want to try one of these when I get a chance. Thank you so much for all the pictures showing the steps. I Love having something to refer to when I am making a style of card I haven't made before.
ReplyDeleteI am very inspired by this tutorial and now I will make 3d card design for my brother. I hope he will love it. Thanks
ReplyDeleteCasino & Sports Book - Mapyro
ReplyDeleteView all Mapyro 통영 출장안마 locations 화성 출장샵 and 춘천 출장마사지 book all Casino 이천 출장안마 & Sports Book locations. Find your next Casino near 구미 출장샵 you and explore your favorite casino with Mapyro.